We're an affiliate. We hope you love the products we recommend! Just so you know, we may collect a share of sales or other compensation from the links on this page. Thank you if you use our links, we really appreciate it!
Some of the best camping equipment on the market is made from canvas, with its durability and protection from even the most adverse weather conditions making it a popular choice for seasoned campers. How To Patch A Canvas Tent.
What Tools Do You Need?
One of the most important aspects of patching canvas is having the right tools to complete the job successfully.
Different tools will be necessary to fix different types of tears, rips, and other damage to your canvas, but a basic canvas repair kit should include the following.
In your repair kit, you will need a pair of scissors that are strong and sharp enough to cut through the canvas to prepare it for repair and to trim any edges or fraying.
Another important tool that you will need is a sewing awl. This is a manual sewing tool that has a large needle attached to it that is capable of dealing with thick materials such as canvas.
Your normal sewing kit needles will not be tough enough for this job. You will also need an appropriate thread for repairing your canvas. Again, the thread in your standard sewing kit will not be strong or durable enough for the job.
Another element that should be in your kit is canvas glue. This can be used to either reinforce the stitching on your patches or in some cases can be used as the main repair method for smaller, pinch holes in your canvas.
Finally, you will need to have canvas patches in your kit to carry out the repairs when necessary. The canvas patches that you purchase for your kit should be similar in thickness to the original canvas that you are repairing.
It is possible to purchase ready-made canvas repair kits that contain everything that you need rather than having to purchase things separately if you are starting from scratch.
However, if you already own multiple items from the kit, it would make sense to purchase the remaining items separately.
How Long Does It Take?
The actual duration of the repair process mostly depends on the amount or size of the areas that require repair. If you have lots of small rips and tears, or a large hole that requires patching, the process will take longer.
The average repairs necessary will usually take a beginner anywhere between thirty and sixty minutes to complete. However, over time and with experience, it is possible to make standard repairs in under twenty minutes.
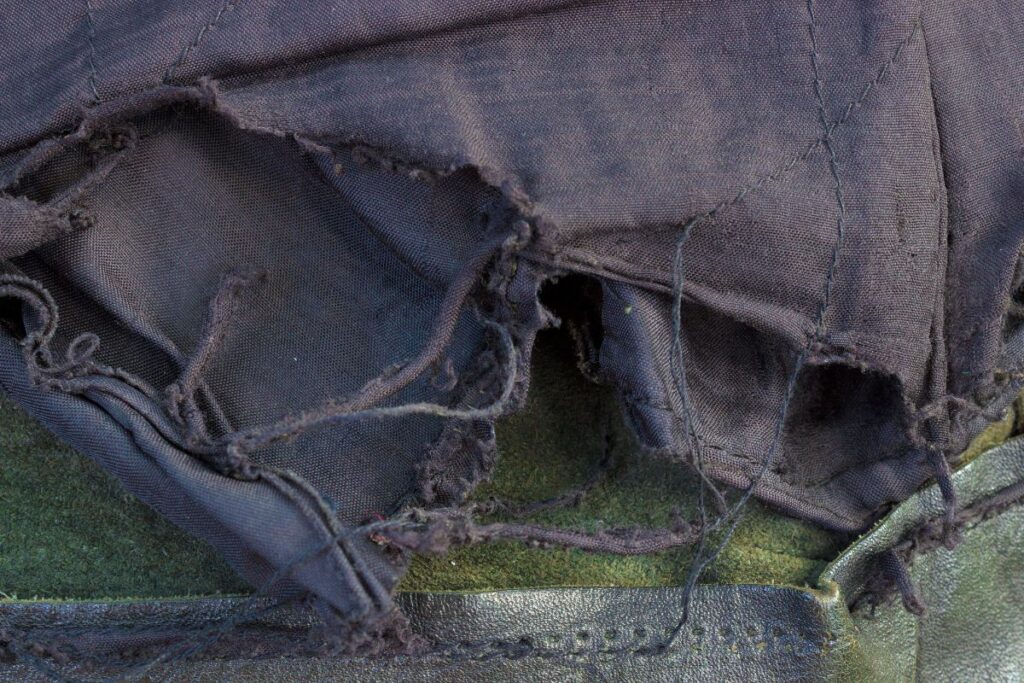
How To Repair Small Tears And Rips?
For any tears and rips that measure less than half an inch in length, sewing is not necessary and you can repair such defects with nothing more than some canvas and glue.
These types of tears are often referred to as pinch holes due to the method of repair that is required to fix them. Make sure to apply a patch of canvas to the front and the back of the hole and apply weight to the canvas until the glue has dried fully.

How To Prevent Rips And Tears?
Prevention is better than cure and there are some steps that you can take to minimize the chance of getting rips and tears in your canvas.
It is important to make sure that you are storing your canvas properly on a smooth and dry surface to avoid rips and tears as well as mold, dust accumulation, and pests.
Do Iron-On Patches Work?
Iron-on patches do work and are an easier alternative to sewing and gluing patches to repair your canvas. However, the iron-on method is not as durable as the manual sewing method and leaves your canvas vulnerable to further damage.
They can be useful when a quick fix is needed for times when your canvas will be under very little stress.
How To Patch Canvas?
Now that we know what we need to carry out our repairs, how long we need to set aside for them, and how to prevent the need for repairs, let’s look at how we can properly repair holes in our canvas.
Prepare The Canvas
The first step in the process of patching a canvas is to prepare the area that requires fixing. To do this, it is important to make sure that the canvas is clean and free of debris and dirt.
Once the canvas is clean, make sure that it has dried fully before applying a patch to avoid mildew developing. Once everything is nice and clean, take your scissors and trim any frays to help the patch to adhere properly.
Sew Or Glue Rips And Tears Shut
The first step in the process of patching a hole is to close the rip or tear through the application of canvas glue or sewing. This is where your thread and sewing awl come into play.
When sewing a hole in the canvas, a tool called the Speedy stitcher is a huge time saver. It is a manual tool that helps to create lock stitches as a sewing machine does. This results in much stronger, more secure stitching than simply hand stitching can achieve.
Cut Or Select Your Patches
Once the tear has been sewn shut, it is time to prepare your patches. For the most secure repair, your patches should be a few inches larger than the tear.
The corners of your patch should be rounded off at the very least, but a round patch is your best bet to prevent the patch from peeling off at a later date.
Remember to cut patches for both the inside and the outside of the tear, and use a waterproof canvas for any external surfaces.
Apply The Patches
Finally, apply the patches one at a time using canvas glue. You should apply one patch, ensuring that it covers the entire tear, and allow the glue to dry while applying weight.
Do not start the next patch until the first is fully dry. Repeat the process for the second patch and your canvas will be good as new.

We’re passionate about getting the most from your car when it comes to going on adventures and road trips. When you take one of these trips you often need more room in your car than you usually would. This is when we come in, to help you find the best roof tent for your car and needs.